
Growing a garden from seed can be both exciting and rewarding. It allows you to handpick the plants you want to grow, save money compared to buying established seedlings, and offers the satisfaction of nurturing tiny seeds into mature, flourishing crops. Yet, despite the joys of seed starting, many beginner (and even experienced) gardeners find themselves facing low germination rates, stunted growth, and disappointing harvests. In most cases, the root of the problem comes down to a handful of avoidable mistakes.
At DH Garden Centre, we’ve observed these slip-ups countless times. The good news? Once you understand why these errors occur, you can correct them and watch your seed-starting success skyrocket. In this comprehensive guide, we’ll explore the 5 dumbest mistakes gardeners make when planting seeds and share proven tips to help you avoid them. By mastering these essential techniques, you can reduce your workload, minimize frustration, and enjoy a thriving, productive garden—all without needing an advanced horticulture degree.
Whether you’re eager to grow lettuce, tomatoes, or beautiful blooms, let’s dive in and learn how to set your seeds up for success.
Mistake #1: Planting Seeds Too Deep or Compacting Soil
Why It Happens
It’s easy to see where this misconception comes from. Many of us were taught in school that when planting a seed, you should push your finger deep into the soil, drop the seed in, and cover it firmly. However, most seeds require a specific planting depth that is often far shallower than people realize. As a general guideline, a seed should typically be planted at a depth equal to about two times its thickness.
For example, pea seeds are relatively large, so they can handle being planted at about 1–1.5 inches deep. However, lettuce or carrot seeds are tiny and usually do best when barely covered by a thin layer of soil. Moreover, if you press the soil too firmly, you risk reducing the airflow around the seed, which hinders germination. Plant roots need oxygen; compacted soil makes it harder for roots to penetrate and for the seedling to emerge.

Why It’s a Problem
- Delayed or Failed Germination: Seeds that are buried too deep may expend all their stored energy just trying to break the soil surface.
- Root Restriction: When the soil is overly compacted, the fragile roots of young seedlings can’t spread effectively to access nutrients and water.
- Reduced Oxygen Flow: Seeds and roots require oxygen to thrive. If the soil is too dense, you’re essentially “choking” your plants at the earliest stage of development.
How to Fix It
- Follow the Two-Thirds Rule: As a quick rule of thumb, plant your seeds about twice as deep as the seed is thick.
- Avoid Compacting the Soil: Lightly tamp the soil rather than pressing down hard. Your goal is just to ensure the seed has good contact with soil, not to “lock” it in place.
- Use a Gentle Soil Mix: Whether you’re starting seeds in trays or sowing directly into garden beds, keep the top layer of soil crumbly and loose. This ensures seedlings won’t struggle to emerge.
Mistake #2: Watering Incorrectly (Overwatering or Underwatering)
Why It Happens
Watering is one of the trickiest parts of seed germination. Some gardeners are so worried about seeds drying out that they drench the soil until it’s sopping wet. Others, uncertain about how much moisture is necessary, might give seeds the occasional sprinkle—which may not be enough for consistent germination.
Why It’s a Problem
- Overwatering: Waterlogged soil can deprive roots of oxygen, leading to rotting seeds or seedling “damping off.” Overly wet conditions also invite fungal diseases.
- Underwatering: Seeds won’t germinate if they dry out, and newly sprouted seedlings can wither if they don’t receive consistent moisture in the early stages.

How to Fix It
- Test the Soil Like a Sponge: Imagine the perfect moisture level is akin to a wrung-out sponge—moist but not dripping. Press a handful of soil; if water seeps out, it’s too wet. If it crumbles and won’t hold shape, it’s too dry.
- Water Gently: Use a fine mist sprayer or a gentle watering can to avoid dislodging seeds, especially if they’re near the surface.
- Mulch Strategically: Once seeds germinate and seedlings appear, applying a thin layer of organic mulch—like straw, fine wood chips, or shredded leaves—helps regulate soil moisture. The mulch holds water within the soil and protects it from rapid evaporation.
- Consider Soaker Hoses or Drip Irrigation: If you live in a hot, dry climate or have large garden beds, a drip irrigation system or soaker hose can provide consistent moisture without flooding.
Mistake #3: Using the Wrong Growing Medium
Why It Happens
When you look at thriving vegetable or flower beds, you often see thick layers of mulch like wood chips or straw. These mulches are fantastic for retaining moisture, adding organic matter, and suppressing weeds. However, many gardeners assume they can just push seeds beneath these materials and expect them to sprout perfectly.
Alternatively, some gardeners utilize heavy clay or poorly draining soil to start seeds, not realizing that certain soil types can stifle young seedlings.
Why It’s a Problem
- Difficulty Emerging: Large pieces of mulch, like thick wood chips, make it nearly impossible for tiny seedlings to break through.
- Poor Drainage or Nutrient Deficiencies: Soil that is too dense or low in organic matter can restrict root growth and lead to waterlogging or nutrient shortages.
How to Fix It
- Rake Back Mulch: If you use deep layers of mulch in your garden, temporarily rake it back when sowing seeds. Once your seedlings have emerged and reached about 2–3 inches tall, gently move the mulch back around them to suppress weeds and retain moisture.
- Amend the Topsoil: For direct sowing, consider placing a thin layer (about 1 inch) of a premium seed-starting mix or potting mix on top of your garden bed. This ensures seeds make contact with a loose, well-draining surface.
- Check Soil Composition: Aim for a mixture that includes organic matter (like compost) and possibly peat moss or coconut coir. These components help maintain a balance of moisture and aeration.
- Try Raised Beds or Containers: If your native soil has serious drainage or compaction problems, raised beds or containers can be a game changer. Fill them with a custom mix optimized for seed germination.

Mistake #4: Planting at the Wrong Time
Why It Happens
Every seed variety has an ideal planting window, influenced by factors like soil temperature, daylight hours, and expected frost dates. Many gardeners get overly excited by a warm spell in early spring—or they wait too long, not recognizing that seeds need enough time (and the proper weather conditions) to mature.
Why It’s a Problem
- Cold Shocks: Seeds sown too early may fail to germinate in cold soil, or they might sprout and then die when temperatures drop again.
- Heat Stress: Seeds requiring cool temperatures (like spinach or lettuce) can bolt or struggle to germinate if sown too late in a hot climate.
- Missed Harvest Windows: Planting warm-season crops (like tomatoes) too late can mean you don’t get a mature harvest before autumn frost arrives.
How to Fix It
- Read Seed Packets: Most seed packets provide recommended planting windows, optimal soil temperature ranges, and days to maturity. This can help you plan your sowing schedule more accurately.
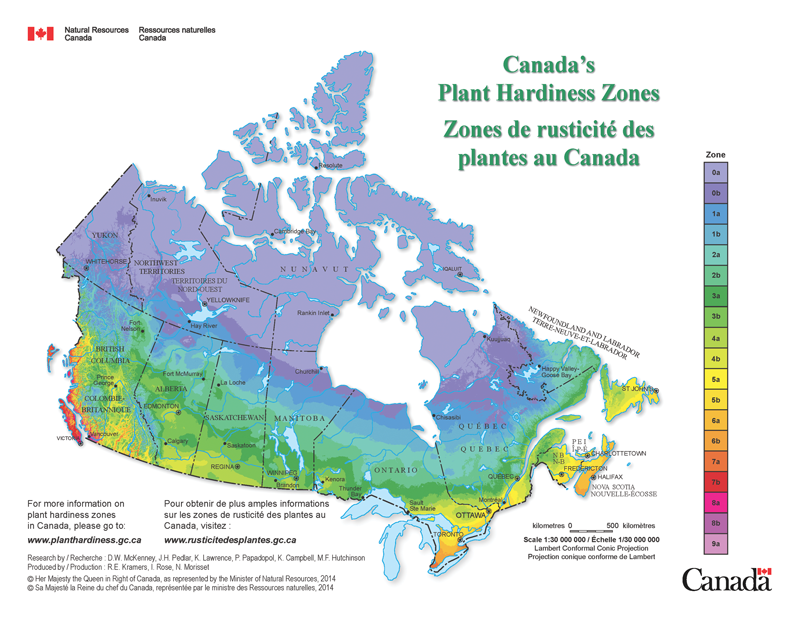
- Know Your USDA Hardiness Zone: While not perfect for annual vegetables, your zone still gives you a baseline for first and last frost dates, helping you time your plantings.
- Stagger Planting: For vegetables like lettuce or radishes that mature quickly, consider succession planting (sowing new seeds every 1–2 weeks) to ensure a continuous harvest.
- Err on the Side of Patience: Often, planting just a bit later than the earliest recommended date is safer. Once the days warm up, seedlings typically catch up quickly and are less prone to pest and disease issues.
Mistake #5: Overlooking the Benefits of Starting Seeds Indoors
Why It Happens
Direct sowing (placing seeds straight into the garden) is straightforward and eliminates transplant shock. However, many gardeners forget that starting seeds indoors—even for a short period—can significantly boost germination rates and plant health, especially for crops with long growing seasons or in regions with unpredictable spring weather.
Why It’s a Problem
- Low Germination Outdoors: Some seeds are highly sensitive to temperature fluctuations, soil quality, or pests when sown directly in the garden.
- Short Growing Seasons: If you live in a region with a brief window of ideal weather, seeds planted outdoors might not have enough time to mature.
How to Fix It
- Invest in Basic Seed-Starting Equipment: You don’t need an elaborate greenhouse. A grow light (or even a sunny window), seed trays, and a quality seed-starting mix can go a long way.
- Maintain Consistent Conditions: Indoor seed-starting allows you to control moisture levels, soil temperature, and light exposure, giving fragile seeds the best chance at robust growth.
- Harden Off Seedlings: Before moving your indoor-grown seedlings outside, gradually acclimate them to outdoor conditions over 7–10 days. Place them in a sheltered, partially shaded spot for a few hours, increasing exposure daily. This process—known as hardening off—helps prevent transplant shock.
- Transplant Carefully: Move seedlings into the garden on an overcast day or in the late afternoon to reduce stress. Water them in well to ensure the root systems connect with the native soil.

Move seedlings into the garden on an overcast day or in the late afternoon to reduce stress.
Bonus Tips: From Soil Tests to Weeding Strategies
Even if you address all the major seed-starting mistakes above, there are additional steps you can take to optimize your garden’s overall health and productivity. Here are a few more expert tips from DH Garden Centre:
1. Test Your Soil
- Why: A soil test reveals your garden’s pH level and nutrient content, helping you determine if you need to add amendments (e.g., lime, sulfur, or fertilizer) for optimal seed growth.
- How: Purchase an at-home soil test kit or send soil samples to a local agricultural extension office. Test results will guide you on how to balance nitrogen (N), phosphorus (P), and potassium (K) levels, as well as pH adjustments.
2. Optimize Sunlight
- Why: Most vegetables and many flowers need at least 6–8 hours of direct sunlight per day. If your seeds are in a shady spot, germination and growth can be slow or uneven.
- How: Observe your garden’s sunlight patterns throughout the day. If certain areas receive limited light, consider planting shade-tolerant crops there (like spinach or certain herbs) and reserve the sunniest spots for plants like tomatoes or peppers.
3. Manage Weeds Wisely
- Why: While some weeds can be beneficial as ground cover or organic matter, an overabundance of weeds will outcompete seedlings for nutrients, water, and sunlight.
- How: If you’re a fan of “no-till” or “lazy gardening,” you can simply chop and drop weeds—cut them at the surface and let them decompose as mulch. However, be sure to remove or suppress heavy weed growth before planting seeds to reduce competition.
4. Use Mulch Effectively
- Why: Mulch retains soil moisture, moderates soil temperature, and suppresses weeds.
- How: Wait until your seedlings establish themselves (2–3 inches tall), then carefully spread a layer of organic mulch (wood chips, straw, shredded leaves) around each plant. Avoid piling mulch directly against stems, as this can encourage rot.
5. Keep Records
- Why: Gardening success often comes from consistent observation and learning from past experiences.
- How: Maintain a simple garden journal or spreadsheet to track planting dates, germination rates, weather conditions, and harvest times. Over time, this data helps you fine-tune your approach to seed starting and general garden maintenance.
Conclusion: Grow Smart, Harvest Better
Planting seeds should be a pleasure, not a chore riddled with confusion and inconsistent results. By recognizing and avoiding these five dumbest mistakes—from planting seeds too deep and watering incorrectly to choosing the wrong soil medium, sowing at the wrong time, and ignoring the benefits of starting seeds indoors—you can set the stage for a healthy, thriving garden that’s brimming with life.
Remember that gardening is a journey, and every season offers a new chance to learn. Even the most seasoned horticulturists make missteps. The key is to embrace experimentation and keep notes on what works best for your specific climate, soil type, and gardening goals. Whether you dream of rows of crisp lettuce, vibrant tomatoes, or fragrant flower beds, these steps form the foundation of successful seed germination and plant growth.
Final Encouragement
- Embrace Failure: Don’t be discouraged if some seeds don’t sprout. Learning from each setback allows you to adapt and refine your methods.
- Check the Details: Read seed packets, note local frost dates, and follow recommended planting depths—these small steps have a big impact.
- Focus on Soil Health: Healthy soil is a living ecosystem. Keep it rich in organic matter, make sure it’s well-aerated, and avoid harsh chemicals.
- Ask for Help: If you’re still having trouble, DH Garden Centre is here to assist. Connect with local gardening communities, forums, or Master Gardener programs for region-specific advice.
By following these guidelines and understanding how to avoid the common pitfalls, you’ll soon see a dramatic improvement in your seed germination rates and overall garden productivity. Here’s to a vibrant, bountiful harvest—and the simple joy of watching life unfold from the smallest of seeds!