
Discover how to start a worm composting system at home using a simple tray bin setup. Learn step-by-step instructions and how worm castings can supercharge your no-dig garden soil—perfect for beginners in Canada.

How to start a worm composting system at home using a simple tray bin setup.
If you’re just getting into gardening, you’ve probably heard of composting. But what if we told you that a little box of worms could transform your kitchen scraps into black gold—and do it cleanly, indoors, even in the winter?
Welcome to the world of worm composting, also called vermicomposting. It’s simple, compact, and one of the best ways to create healthy, living soil for your no-dig garden beds.
At DH Garden Centre, we love teaching beginner gardeners how to build soil, not just buy it. So let’s walk you through how worm bins work, how to get started, and how this ties perfectly into your no-till, no-dig garden system.
Why Worm Composting? Why Now?
You don’t need a big yard. You don’t need expensive equipment. And you definitely don’t need to wait years to get usable compost.
Worm composting gives you:
-
Fast, high-quality compost (called worm castings)
-
Liquid fertilizer (called worm tea or compost tea)
-
A clean, odor-free system that fits in your home, balcony, or garage
-
An incredible soil amendment to supercharge your no-dig beds
It’s the ideal composting system for urban gardeners, renters, and anyone looking to turn waste into wellness—for their soil.
What Is a Worm Composting Bin?
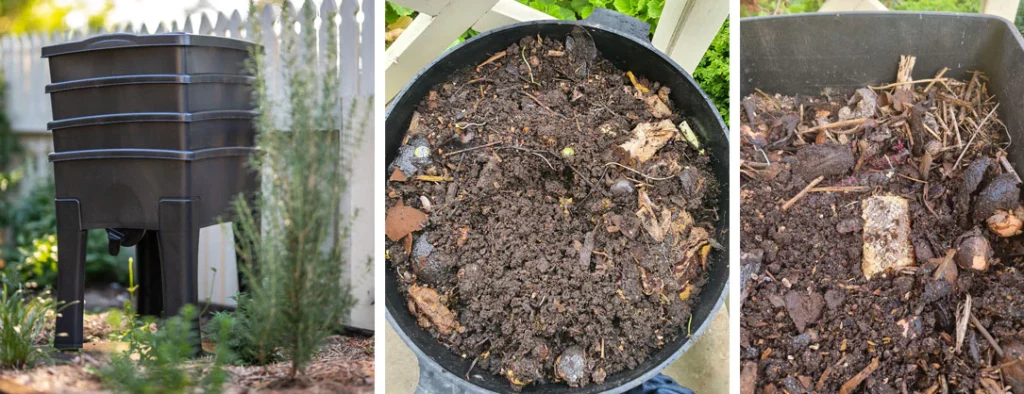
A worm compost bin is a multi-tray system that houses red wigglers (Eisenia fetida), a species of composting worms. It includes:
-
A base tray to collect worm tea (compost tea)
-
A drain spout to access the liquid easily
-
A filter layer to prevent worms or food bits from falling through
-
One or more working trays where worms live and break down food
-
A lid to keep everything covered and dark (worms hate light!)
As worms digest food scraps and bedding, they produce castings—essentially nutrient-packed worm poop. You harvest this to enrich your garden soil.

A worm compost bin is a multi-tray system that houses red wigglers (Eisenia fetida), a species of composting worms.
Step-by-Step: How to Start Your Worm Composting Bin
Let’s walk through exactly how to set it up at home.
Step 1: Prepare the Base Layer
This is the bottom part of your bin where liquid fertilizer collects. Also known as “worm juice” or compost tea, this can be diluted and used as an all-natural fertilizer for your houseplants or garden.
Make sure your bin has a drain spout—this makes collecting tea easy and prevents flooding, which worms hate.
Step 2: Add the Filter Layer
Above the base is a filter tray—this keeps bedding, food scraps, and worms from falling down into the liquid. It ensures the system stays clean and functional.
Step 3: Build the First Worm Tray
Here’s where the action happens.
-
Add bedding materials—shredded newspaper, dry leaves, or coco coir (carbon-rich materials).
-
Fill the tray about halfway.
-
Sprinkle in coffee grounds—they add grit that helps worms digest food.
-
Gently place in your red wigglers.
-
Add a light cover of bedding over the worms.
-
Pop on the lid and let them settle in for a week before feeding them kitchen scraps.
🪱 Tip: Don’t feed right away! Give the worms 5–7 days to acclimate to their new environment.
Step 4: Begin Feeding—Add Nitrogen-Rich Scraps
Once your worms have settled, start adding small amounts of kitchen scraps:
-
Fruit and veggie peels
-
Tea bags (no staples!)
-
Crushed eggshells
-
Small bits of bread or pasta (minimal)
Avoid: Citrus, dairy, meat, oily foods, spicy foods, and onions—they can smell or harm the worms.
For every handful of food, add a handful of dry bedding to balance carbon and nitrogen. This keeps odors down and ensures healthy decomposition.
Step 5: Add the Second Tray
Once your worms work their way up to the top of the first tray, you can add a second tray on top.
-
Fill it with bedding and some food scraps.
-
Worms will migrate upward in search of food.
-
As they leave behind rich castings in the lower tray, you can harvest it after a few weeks.
It’s a continuous cycle—each new tray goes on top, while the tray at the bottom is ready to be harvested.
How to Harvest and Use Worm Castings
Once a tray is full of worm castings and most worms have moved up:
-
Let the tray sit for 3–4 weeks to allow the compost to mature.
-
Then, harvest your worm castings—dark, crumbly, odor-free compost.
-
Use it to:
-
Top-dress houseplants
-
Mix into seed starting mix
-
Feed garden beds
-
Brew compost tea
-
💧 Compost tea tip: Use the drain at the bottom to collect liquid. Dilute 1:10 with water before applying to your plants.
How Worm Composting Supports No-Dig Gardening
Worm castings are pure gold for no-dig gardening, especially in raised beds or compact city gardens.
Here’s how they help:
-
Feed soil biology – They’re full of beneficial microbes that support healthy root growth.
-
Boost structure – Castings improve water retention and soil texture.
-
Suppress disease – Healthy microbial life means less room for pathogens.
-
Natural fertilizer – High in nitrogen, phosphorus, potassium, and trace minerals—slow-releasing and gentle.
In a no-dig system, where we avoid disturbing the soil layers, adding castings as a top layer keeps the ecosystem intact. Worms and microbes will naturally incorporate the nutrients.
You’re feeding the soil—not the plant. And that’s the foundation of regenerative, low-maintenance gardening.