
Learn how to grow a pine tree from a pine cone with this step-by-step guide. Understand seed extraction, stratification, germination, transplanting, and troubleshooting so you can successfully grow your own pine tree at home.
How to Grow a Pine Tree From a Pine Cone: The Complete Beginner-Friendly Guide
Growing a pine tree feels a little bit like bottling a piece of the forest and bringing it home. Many gardeners assume it is complicated or impossible, but the truth is, if you understand the stages and the timing, growing a pine tree from a pine cone is absolutely within reach.
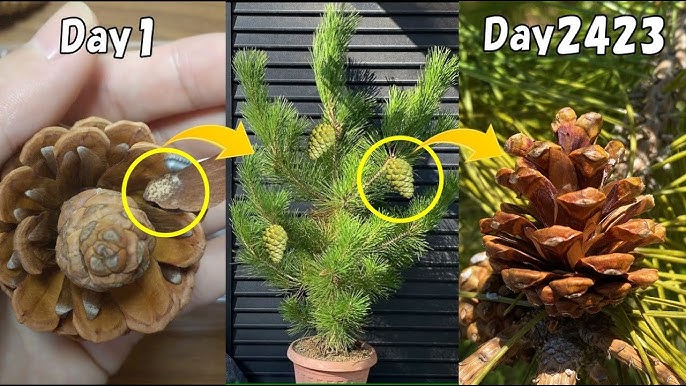
This guide follows a real-life journey-Day 1 through Day 96-showing exactly what happens, what works, what doesn’t, and what beginners need to know before they start. Whether you found a beautiful closed pine cone during a hike or simply want to grow your own evergreen, this walkthrough will help you succeed.
By the end, you’ll know:
How to pick the right pine cone
How to extract and prepare viable seeds
How cold stratification actually works
How long germination really takes
How to transplant and care for seedlings
This is friendly expert guidance, simple, practical, and honest, without complicated jargon.

Step 1: Find a Closed, Mature Pine Cone
Your journey begins with the most essential ingredient: a closed, fully developed pine cone. Pine cones only release seeds under the right combination of dryness and warmth, which means:
A closed pine cone often still contains seeds
An open pine cone usually already released them
A sunny windowsill is the perfect place to start. When the cone warms up and dries out, it slowly begins to open, loosening its scales in preparation for seed drop.
TIP: Avoid cones that are moldy, cracked, or damaged—those rarely contain viable seeds.
Day 1-Day 7: Warming the Pine Cone and Releasing the Seeds
Day 1 – Windowsill Setup
Place your pine cone on a bright, warm windowsill. The heat helps it dry and expand. Some cones open within a few days, while others take up to two weeks depending on humidity.
Day 4 – First Checkpoint
If you notice no seeds yet, don’t worry, 14 days is normal for some pine species. You may hear a faint rattle when you shake the cone, which means the seeds are loose inside.
Day 7 – Seed Extraction
When the cone begins rattling, the seeds are ready to be removed. You can:
Tap the cone into a bowl
Pull apart the scales gently
Or lightly “smash” the cone (as some growers do) if it’s very stiff
Do this slowly to avoid damaging the seeds.
Step 2: Remove Wings (“Tails”) and Prepare Seeds for Soaking
Most pine seeds have a papery attachment known as a seed wing. In nature, this wing helps the seed travel through the air. For germination, though, it serves no purpose.
Remove the wing by:
Pinching it gently
Twisting it off
Or clipping it with small scissors
This improves seed-to-soil contact later in the germination process.
Step 3: Soak the Pine Seeds for 12-18 Hours
Place your clean seeds into a cup of water and let them soak overnight. Soaking helps:
Rehydrate dry seeds
Separate viable from non-viable seeds
Initiate the first stage of germination
Key observation:
Seeds that sink are usually viable.
Seeds that float are often empty or infertile.
This floating test is not perfect, but it is widely used across horticulture.
TIP: Stir the water after soaking to double-check the floaters.
Step 4: Sort the Viable Seeds
After soaking, separate the seeds into two groups:
Floating seeds → usually not viable
Sinking seeds → viable and worth germinating
While the internet sometimes offers conflicting advice, experienced growers consistently report that sunken seeds have a far higher sprouting rate.
Once sorted, pat the viable seeds dry gently with paper towel.
Step 5: Cold Stratification – The Crucial 90-Day Step
Pine seeds need a period of cold, moist dormancy to trigger germination. In nature, this happens when seeds lie under winter snow. At home, we replicate this process in the refrigerator.
How to Stratify Pine Seeds
Prepare a small zip bag with moist potting mix (not soggy).
Spread the viable seeds inside the soil mixture.
Seal the bag, leaving a tiny air gap for ventilation.
Place it in the refrigerator for 90 days.
During this period:
Seeds are kept cold but not frozen
Moisture softens the seed coat
Internal chemical changes trigger germination readiness
This step is non-negotiable for most pine species.
Day 17 – Early Surprise Germination
While many gardeners expect pine seeds to sprout after 60-90 days, some seeds germinate shockingly quickly-even within 7-20 days.
If you see white roots emerging inside the bag, congratulations:
Your pine seeds have successfully germinated!
However, if your seeds haven’t sprouted by Day 90, don’t panic, pine species vary dramatically. Follow a traditional stratification timeline or consider the alternative warm-cold-warm treatment (explained in FAQs below).
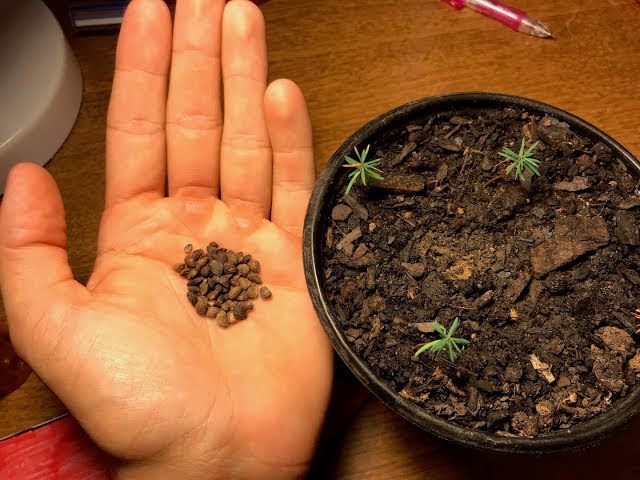
Step 6: Planting the Germinated Pine Seeds
Once roots appear:
Fill a small pot with well-draining potting mix.
Use a pot with drainage holes.
Plant each germinated seed about 1 cm deep.
Water gently until the soil surface is evenly moist.
Keep the pot in bright, indirect light and maintain light moisture—not soggy conditions.
Why 1 cm depth?
Pine seedlings have thin, fragile stems. Planting too deep slows growth; planting too shallow dries the roots.
Day 96 – Transplanting Your Young Pine Tree
By now, about 70 days after germination, your pine seedling will have:
A firm central stem
A cluster of soft needles
A root system ready for more space
Move the seedling to a slightly larger pot, or outdoors if weather allows and frost danger is gone.
Transplanting Tips
Handle the seedling by the soil, not the stem.
Keep roots intact, pines dislike disturbance.
Plant at the same depth as before.
Water thoroughly after transplanting.
Your pine tree is now well on its way to becoming a sturdy juvenile tree.

Troubleshooting: Why Pine Seeds Sometimes Fail
Even with perfect technique, some seeds simply don’t sprout. Here are the most common reasons:
1. Old or Non-Viable Pine Cones
Seed viability decreases rapidly after cones release their seeds in nature.
2. Species Differences
Certain pine species need longer stratification or warmer pre-treatments.
3. Improper Moisture Levels
Too dry → seeds remain dormant
Too wet → seeds rot
4. Incorrect Temperature
Refrigerators above 8°C slow stratification dramatically.
5. Skipping Stratification
Most pines require cold conditioning.
Care Tips for Young Pine Trees
To keep your pine seedling thriving:
Give it full sun once strong enough.
Water deeply but infrequently.
Avoid fertilizing seedlings too early.
Protect from strong wind and heavy rain.
Repot only when roots fill the container.
Pine trees are incredibly hardy once established—but delicate when young.
H2. FAQs About How to Grow Pine Tree From Pine Cone
1. Can I plant a pine cone directly into soil?
No. Pine cones are not seeds, they’re seed carriers. The seeds must be removed, cleaned, stratified, and germinated separately.
2. How long does it take to grow a pine tree from a pine cone?
Expect:
1–2 weeks for cone opening
1–3 months for stratification
1–3 weeks for germination
Several months before transplanting
3. Do all pine seeds need cold stratification?
Most species do, although some warm-climate pines germinate without cold treatment. When in doubt, stratify.
4. Why did my seeds sprout in 9 days instead of 90?
Some cones release seeds that have already undergone natural stratification outdoors. Others germinate early due to internal hormonal readiness.
5. Can I grow pine trees indoors permanently?
Not realistically. Pines need full sun, wind exposure, and seasonal temperature swings. Keep seedlings indoors only temporarily.
Growing a Pine Tree Is a Slow, Rewarding Art
Learning how to grow a pine tree from a pine cone is like learning a secret rhythm of nature. The process isn’t fast—but every stage teaches patience, observation, and appreciation for how trees begin their lives.
From hunting the perfect cone…
to waiting through cold stratification…
to celebrating each tiny sprout…
you are creating something that can stand for decades maybe centuries.
Give your pine tree time, and it will give you a forest in return.