
Learn how to propagate orchids from a flower spike using a gentle, natural method. Step-by-step orchid propagation guide from DH Garden Centre.
Giving New Life to a Finished Orchid Flower Spike
When an orchid finishes blooming, many growers assume the flower spike has served its purpose. In reality, that spike may still hold the potential for new life.
At DH Garden Centre, we often encourage orchid lovers to look beyond traditional methods and explore gentle, natural ways to propagate their plants. One of the most fascinating techniques is orchid propagation from a flower spike. With patience and proper care, a spike that has already bloomed can develop into an entirely new orchid plant.
This method is ideal for home growers because it:
-
Requires no special equipment
-
Uses natural ingredients
-
Works well indoors
-
Allows you to create new orchid pots from existing plants
In this guide, we will walk through the entire process step by step, from selecting the right nodes to caring for the young plant until it is ready to be potted on.

Understanding Orchid Flower Spikes and Nodes
An orchid flower spike contains multiple nodes, often covered by a thin membrane. Not all nodes are equal.
-
Nodes that have already bloomed will not produce new plantlets
-
Dormant, unbloomed nodes still contain viable growth tissue
These dormant nodes, sometimes called “sleeping eyes,” are where orchid propagation becomes possible. Selecting the correct nodes is the foundation of success.
When Is the Best Time to Start Orchid Flower Spike Propagation?
The ideal time to propagate orchids from a flower spike is just after the flowers begin to fade.
At this stage:
-
The spike still contains stored nutrients
-
The plant has completed flowering and is transitioning to recovery
-
Dormant nodes are more responsive to stimulation
Waiting too long reduces vitality, while cutting too early may weaken the mother plant.
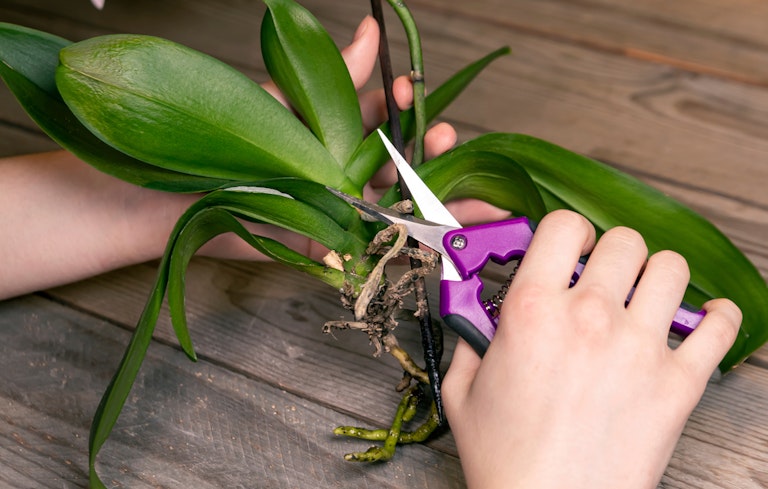
Step 1: Preparing the Flower Spike
Begin by cutting the flower spike from the orchid using clean, sterilized tools.
Carefully remove:
-
Any nodes that have already bloomed
-
Damaged or dried sections of the spike
Select one or two healthy, unbloomed nodes for propagation. Trim the base of the spike at a slight angle to increase surface area for nutrient absorption.
This clean cut reduces the risk of rot and encourages faster recovery.
Step 2: Exposing the Dormant Bud
Each dormant node is protected by a thin membrane. Gently peel this membrane away using clean fingers or tweezers.
This step:
-
Exposes the dormant bud
-
Encourages faster activation
-
Improves nutrient absorption
Handle carefully to avoid damaging the bud underneath.
Step 3: Using Aloe Vera to Stimulate Rooting
Aloe vera is a powerful natural ingredient in orchid propagation from flower spike methods.
Its benefits include:
-
Natural rooting stimulation
-
Antibacterial and antifungal protection
-
Moisture retention
Insert the cut end of the flower spike directly into the fleshy interior of a fresh aloe vera leaf. Ensure the dormant bud is in contact with the gel.
Leave the spike undisturbed for about one hour so the gel can be absorbed.
Step 4: Preparing a Natural Rooting Solution
To continue supporting the propagation process, prepare a natural nutrient solution using:
-
Fresh aloe vera gel
-
Cinnamon powder
-
Vitamin B1
Aloe Vera Water
Chop remaining aloe vera into small pieces and soak in 500 milliliters of room-temperature water.

Cinnamon Water
Add one teaspoon of cinnamon powder to 500 milliliters of boiling water. Allow it to cool completely, then strain out residue.
Cinnamon acts as a natural antibacterial agent, helping prevent fungal infections.
Vitamin B1
Crush three tablets of vitamin B1 (2.5 mg each) and add them to the combined aloe and cinnamon solution.
This mixture gently stimulates root development without overwhelming the cutting.
Step 5: Soaking the Flower Spike
Submerge the cutting in the prepared solution for approximately 20 minutes, ensuring the dormant bud is fully covered.
This soaking step allows nutrients to penetrate deeply into the spike and activate the bud.
After soaking, gently pat the cutting dry with a clean cloth.
Step 6: Protecting the Cut With Toothpaste
Apply a small amount of salt-free toothpaste to the cut surface.
This may sound unusual, but toothpaste:
-
Provides antibacterial protection
-
Seals the wound
-
Supports faster healing
Allow it to dry naturally before planting.
Step 7: Preparing the Growing Medium
Moist sphagnum moss is an excellent medium for orchid propagation.
Soak the moss in the remaining nutrient solution for about 20 minutes, then gently squeeze out excess water. The moss should be moist but not dripping.
This creates a clean, airy, and humid environment ideal for young orchid development.
Step 8: Planting the Orchid Cutting
Place the cutting into a small pot or recycled plastic cup with drainage holes.
-
Position the cutting so the dormant bud faces upward
-
Allow the bud to gently touch the moss
-
Do not bury the bud deeply
Cover the pot with a transparent lid or plastic dome with small ventilation holes to maintain humidity while preventing mold.
Step 9: Placement and Ongoing Care
Place the pot in a location with:
-
Gentle, indirect light
-
Good airflow
-
No direct sunlight
Check moisture regularly and lightly mist when the moss begins to dry. Stable humidity is essential during this stage.
Avoid disturbing the cutting unnecessarily.
Results: What to Expect Over Time
With consistent care:
-
After 45 days: New shoots begin emerging from dormant buds
-
After 3 months: Stronger leaves and early root formation appear
These are signs that the orchid has successfully transitioned into a young plant.
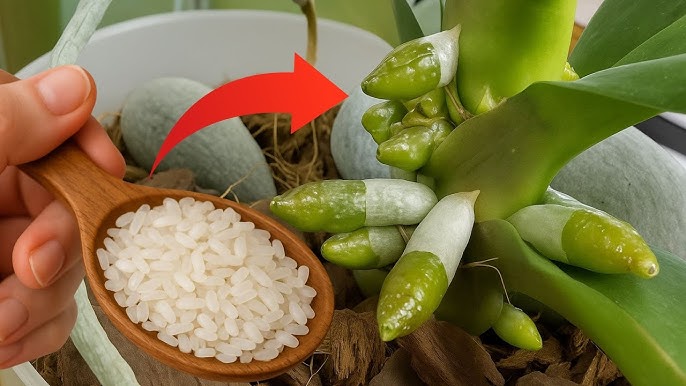
Feeding Young Orchids With Rice Water
Once growth is established, gentle feeding can begin.
Mix:
-
One teaspoon of rice
-
500 milliliters of water
Stir well and strain to obtain clear rice water. Mist the orchid every 7–10 days.
Rice water provides mild nutrients without stressing the young plant.
When to Repot the New Orchid
When the orchid develops:
-
Firm, thick leaves
-
A healthy, dense root system
It is ready to move into a larger pot.
Choose:
-
A pot with drainage holes
-
A well-draining medium such as pine bark, charcoal, fern fiber, or dried moss
Handle gently to help the plant settle quickly.
FAQ: Orchid Propagation From Flower Spike
Can every orchid be propagated from a flower spike?
This method works best for Phalaenopsis orchids and similar types.
How long does propagation take?
Initial shoots appear within 1–2 months, with full development taking several months.
Is aloe vera necessary?
It is not mandatory, but it significantly improves success rates.
Can this method be used year-round?
Yes, but warmer seasons with good light yield better results.
Final Thoughts From DH Garden Centre
Orchid propagation does not need to be complicated. By understanding plant biology and using gentle, natural methods, growers can create new orchids from what might otherwise be discarded.
At DH Garden Centre, we believe successful gardening comes from patience, observation, and respect for natural processes. Propagating orchids from flower spikes is a rewarding way to deepen your connection with these remarkable plants.
Looking for orchid supplies, sphagnum moss, LECA, or expert advice on orchid care and propagation?
Visit DH Garden Centre and let us help you grow healthier orchids and create new plants with confidence.

Whether you’re shopping for plant lovers, hunting for meaningful plants, or simply looking to add a touch of green to your own holiday décor, DH Garden Centre has everything you need for a joyful, vibrant, and beautifully green Christmas.
Visit DH Garden Centre today: where the holidays grow brighter, one plant at a time.