
Learn expert vegetative propagation methods: division, cuttings, grafting and layering to clone your favourite garden plants and fill your beds for free.
Vegetative propagation: how to clone your garden plants for free
Walk through any good nursery and it is tempting to put one of everything in your cart. But some of the best plants in a mature garden are not nursery purchases at all; they are clones taken from plants you already own. That is the power of vegetative propagation and, once you understand a few core techniques, you can turn one healthy perennial into ten.
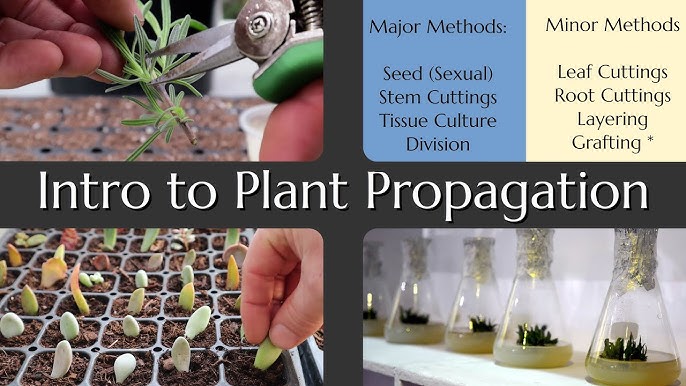
In this guide, we will look at four cornerstone methods of plant propagation used by home gardeners and professional growers alike:
-
Division
-
Cuttings
-
Grafting
-
Layering
The examples draw on real garden practice in a cool coastal climate similar to Vancouver, BC, but the principles apply almost anywhere.

What is vegetative propagation?
Vegetative propagation simply means creating new plants from existing ones without using seed. Instead of waiting for pollination and germination, you use pieces of stems, roots, or crowns and persuade them to grow new roots and shoots.
Why gardeners love it:
-
You get exact copies of a plant you already know performs well in your garden.
-
You can fill bare spots quickly and cheaply.
-
You can rejuvenate overgrown clumps and keep prized varieties going for years.
The main vegetative propagation methods are surprisingly straightforward once you know when and how to use them.
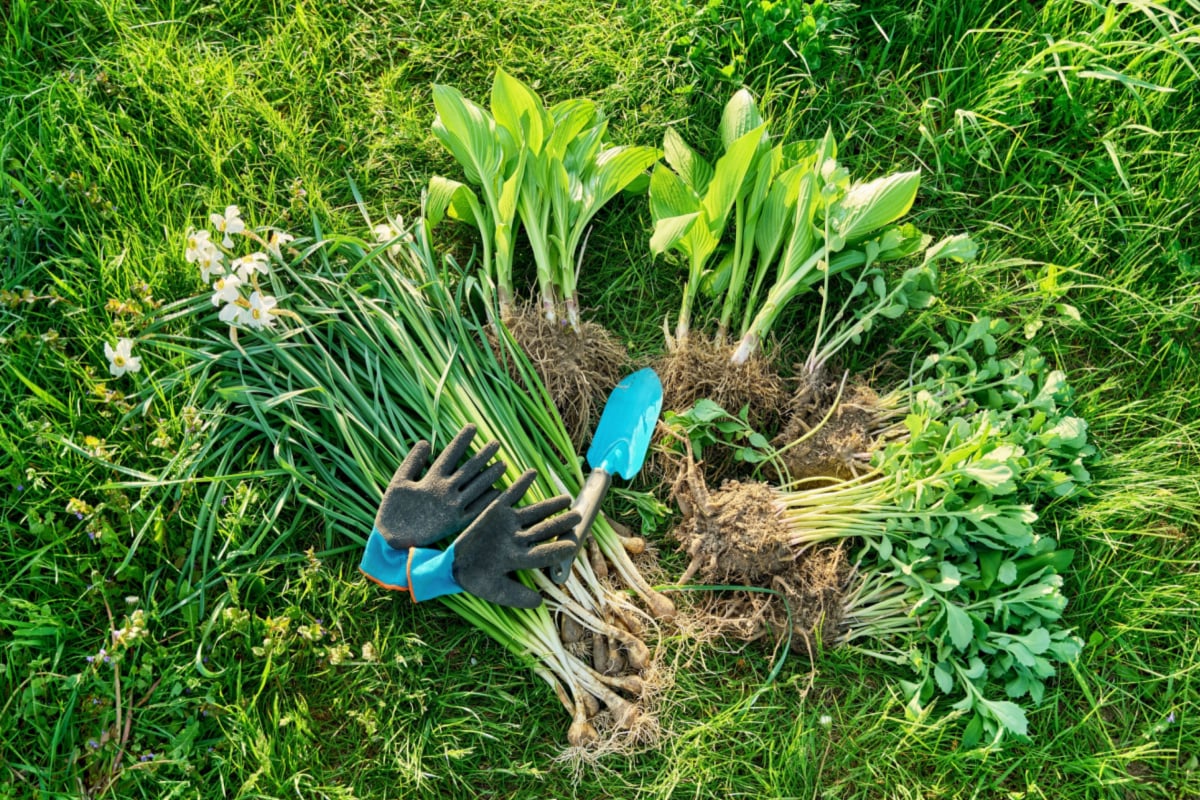
Method 1: Division: multiplying perennials the easy way
If you only learn one way to propagate plants, make it division of perennials. It is quick, physical work and often gives instant garden-ready plants.
When to divide
The best time to divide perennials is usually:
-
Early spring – just as new shoots are emerging but before they have a lot of soft growth you could damage.
-
Early fall – when soil is still warm but the worst summer heat has passed.
Tools and basic steps
You do not need fancy equipment for division:
-
A digging fork, spade or sturdy shovel
-
A knife or pruning saw for woody crowns
-
Your hands
Steps for division of perennials:
-
Lift the clump
-
Insert your fork or spade around the perimeter and gently lever the whole plant out of the ground.
-
-
Break or cut into sections
-
Tease the roots apart with your hands where possible.
-
For tougher plants, slice through the crown with a knife or shovel.
-
-
Check each division
-
Each piece should have a healthy section of root and several growing points or buds.
-
-
Replant or pot up
-
Plant divisions into their new spots at the same depth as the original plant, or pot them into containers to grow on.
-
Which plants respond well to division?
Division is ideal for:
-
Flowering perennials (geraniums, daylilies, asters, hostas)
-
Groundcovers (catmint, creeping thyme, ajuga)
-
Edibles with a crown such as rhubarb and chives
Beyond getting “free plants,” division also keeps mature clumps from becoming overcrowded, which improves flowering and reduces competition for water and nutrients. Many perennials benefit from being divided every two to four years.
Method 2: Propagating plants from cuttings
If division multiplies clumps, cuttings multiply stems. Cuttings are the backbone of many commercial nurseries and a key technique in any serious plant propagation toolkit.
Think of:
-
Woody herbs like rosemary, sage and thyme
-
Soft tropical houseplants
-
Fruiting shrubs such as figs and goji berries
All of these can be cloned reliably with the right type of cutting.
Timing: softwood vs hardwood cuttings
The right timing depends on the plant and the kind of stem you are working with:
-
Hardwood cuttings
-
Taken from dormant, leafless wood in late fall or winter.
-
Ideal for deciduous shrubs and vines such as figs, grapes, currants and goji.
-
-
Softwood or green cuttings
-
Taken in late spring or early summer from fresh, flexible growth.
-
Perfect for herbs, many perennials and non-woody ornamentals.
-
In a cool climate, taking hardwood cuttings while the plant is still dormant avoids the problem of soft shoots wilting as soon as they are separated from the parent. Softwood cuttings need more humidity and gentler handling but can root very quickly.
How to choose good cutting material
When you’re preparing softwood cuttings at home, look for:
-
Healthy shoots with no signs of disease or insect damage
-
Firm but flexible stems (not mushy, not woody)
-
Tips 10–15 cm (4–6 in) long
A simple trick: the distance between your fully stretched thumb and little finger is roughly 15 cm, so you can eyeball the length in the garden and refine it later at the potting bench.
Avoid:
-
Flowering stems (flowers drain energy away from rooting)
-
Weak, pale growth from deep shade
-
Old, woody stems for this method
Keep cuttings moist from the start
The moment a cutting is removed from the plant, it begins to dry out. To protect your future clones:
-
Carry a small container or plastic bag with a damp paper towel.
-
Slip cuttings inside as you work to maintain humidity.
-
Keep them cool and shaded until you can process them.
Once a cutting dries and wilts, it is essentially lost.
Preparing the propagation station
Successful vegetative propagation from cuttings depends on a controlled environment. Set up your station before you start processing:
-
Containers: cell trays, plug trays or small pots
-
Medium: a light, airy mix such as seed-starting compost blended with extra perlite for drainage and oxygen around the developing roots
-
Rooting hormone: gel, liquid or powder to encourage root formation
-
Clean tools: sharp pruners or a knife disinfected between batches
Never dip cuttings straight into your main bottle of rooting hormone. Decant a little into a separate dish so you don’t contaminate the whole container with moisture and plant debris.
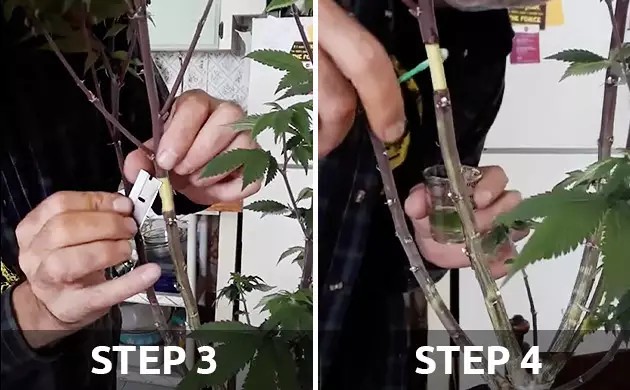
Step-by-step: from stem to rooted plant
-
Count the nodes
-
A good cutting usually has at least four nodes (the little bumps where leaves or buds emerge).
-
-
Make a clean cut
-
Cut just below the lowest node you plan to keep. This zone is rich in natural hormones that trigger rooting.
-
-
Reduce leaf area
-
Strip off the lower leaves.
-
If remaining leaves are large, cut them in half to reduce water loss.
-
-
Apply rooting hormone
-
Lightly dip the base of the cutting and the lowest node into the hormone. Shake off excess.
-
-
Insert into medium
-
Use a dibber or pencil to make a hole, then firm the medium gently around the stem so it stands upright.
-
-
Create a humid environment
-
Place cuttings under a clear humidity dome, in a mini greenhouse, or inside a clear plastic bag supported so it doesn’t touch the leaves.
-
-
Provide bottom heat (optional but powerful)
-
A heat mat keeps the medium slightly warmer than the air, speeding root formation in many species.
-
Open the dome or bag once or twice a day to refresh the air and prevent fungal buildup. Depending on the plant, rooting may take a couple of weeks to more than a month.
Can’t I just root everything in water?
Some plants, especially those in the mint family like basil, oregano, sage and thyme, root happily in a jar of water. Once they show a decent mass of roots, you can pot them into soil.
However, woodier plants or species that are reluctant rooters often perform better in a proper propagation medium from the start. Water-grown roots can be fragile and adapt poorly to soil, so use water rooting only for easy species.
A legal note on cloning named varieties
If a plant has a trademark symbol or a fancy marketing name, it may be legally protected. While no one will stop you from propagating one or two for your own yard, cloning and selling registered varieties without permission from the breeder can violate plant patent or trademark law. Always check before you plan to sell your propagated plants.
Method 3: Grafting: advanced but powerful
Grafting fruit trees is a more advanced form of vegetative propagation, but it unlocks possibilities no seed can offer. With grafting, you join a desirable variety (the scion) to a compatible root system (the rootstock) so that they grow as a single plant.
Why graft?
-
To preserve unique varieties that do not come true from seed (most apples and citrus).
-
To combine disease-resistant or dwarfing rootstocks with high-quality fruiting tops.
-
To put multiple varieties on one tree for small gardens.
Timing and compatibility
For most temperate fruit trees, the best time to graft is late winter to early spring while the tree is still dormant, just before buds swell. Some types of budding are also done in mid to late summer.
Scion and rootstock must be botanically compatible (usually the same species or close relatives). For example:
-
Apple onto apple or crabapple
-
Pear onto pear or compatible quince rootstock
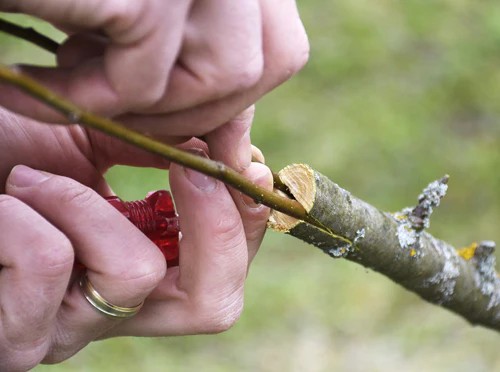
Common grafting methods
-
Whip and tongue graft
-
Both scion and rootstock are cut with matching sloping cuts and small “tongues” so they interlock.
-
The union is wrapped tightly with grafting tape until the tissues fuse.
-
-
Chip budding
-
A single bud from the desired variety is sliced off with a small chip of wood.
-
A matching notch is cut into the rootstock and the bud chip inserted and wrapped.
-
Next season, that bud grows out to form the new top, and the old top of the rootstock is removed.
-
Grafting takes practice and a very sharp knife, but it is the standard professional method for many fruit crops.
Method 4: Layering: the low-effort way to clone plants
If you like results with minimal fuss, layering plants may become your favourite technique. Instead of cutting stems off and hoping they root, you persuade parts of the plant to root while still attached.
Think of it as “backwards cuttings.”
Simple stem layering
This method works wonderfully on flexible perennials and low shrubs like catmint, oregano, gooseberries and some groundcovers.
-
Choose a healthy, low stem that can bend to soil level.
-
Gently scrape or wound a small section on the underside of the stem where it will touch the soil, especially for woodier plants.
-
Pin that wounded section to the soil using a rock, landscape staple or bent wire.
-
Cover lightly with soil or compost, keeping the tip of the stem above ground.
-
Water occasionally so the buried section never dries completely.
Over a few months, the plant responds to the wound and soil contact by producing adventitious roots at that point. When you see strong roots, sever the new plant from the parent and transplant it to its own spot.
Why layering is so forgiving
-
The stem stays connected to the parent, so it continues to receive water and nutrients while roots form.
-
Timing is less critical than with cuttings; you can start layering any time the plant is actively growing.
-
It requires almost no special equipment.
Not every species responds well, especially very woody or upright shrubs, but for sprawling perennials layering is a lazy gardener’s dream.
Which vegetative propagation method should you use?
Here is a quick guide to match methods to plants:
-
Division: clump-forming perennials, crowded groundcovers, herbs with crowns (chives, rhubarb).
-
Softwood cuttings: leafy perennials, herbs, many houseplants, non-woody ornamentals.
-
Hardwood cuttings: deciduous shrubs, vines and some fruiting plants (figs, grapes, currants, goji).
-
Grafting: apples, pears, many fruit trees and ornamentals that don’t grow true from seed.
-
Layering: plants with low, bendable stems such as catmint, oregano, some berries and shrubs.
The beauty of vegetative propagation is that you can mix and match these methods throughout the season. Division in early spring, hardwood cuttings in late winter, softwood cuttings in summer, layering whenever stems are pliable and grafting during dormancy – together they allow you to build a full, resilient garden from a small starting collection.
Calls to action
-
Walk through your garden this week and identify at least three plants you could divide, layer or take cuttings from.
-
Set up a simple propagation station with trays, a light mix and a humidity dome so you’re ready when the season and plants are right.
-
Keep notes on which plant propagation methods work best for each species in your garden – you’ll build your own local playbook over time.
FAQs about vegetative propagation
1. What is the easiest vegetative propagation method for beginners?
Division is by far the most forgiving method. If you can dig and replant, you can divide perennials. Layering is a close second because the plant does most of the work while still attached to its own roots.
2. When is the best time of year to start vegetative propagation?
It depends on the method:
-
Division – early spring or early fall
-
Hardwood cuttings – late fall through winter while plants are dormant
-
Softwood cuttings – late spring to mid-summer
-
Grafting – late winter to early spring, or summer for budding
-
Layering – any time during the active growing season
In cool coastal climates, avoid extreme heat or deep frost for most work.
3. Do I need rooting hormone for cuttings?
Many easy plants root without hormone, especially soft herbs. However, for woodier material or high-value cuttings, a modest amount of rooting hormone increases success and speeds root formation. Use it sparingly and never contaminate the original container.
4. Can I propagate patented or trademarked plants?
You can usually propagate them for your own garden, but you may not legally clone and sell them without permission from the breeder or license holder. Always read the plant tag; it often states “asexual propagation prohibited” if restrictions apply.
5. Why did my cuttings rot or dry out instead of rooting?
Common causes include:
-
Using heavy, waterlogged medium with poor air circulation
-
Allowing cuttings to dry out before sticking them
-
Leaving too much foliage on the stem
-
Placing them in direct, hot sun rather than bright, indirect light
Adjusting moisture, light and hygiene usually improves success dramatically.
With these methods in your vegetative propagation toolkit, your garden becomes its own nursery. Instead of buying duplicates, you can clone the plants you already love, adapt them to your microclimate and fill every bare patch with something tried and true.

Whether you’re shopping for plant lovers, hunting for meaningful plants, or simply looking to add a touch of green to your own holiday décor, DH Garden Centre has everything you need for a joyful, vibrant, and beautifully green Christmas.
Visit DH Garden Centre today: where the holidays grow brighter, one plant at a time.